Battery switch on travel trailer function is crucial for managing your RV’s power. Understanding how this simple yet vital component works can prevent frustrating breakdowns and ensure a smooth camping experience. This guide will walk you through the different types of battery switches, their operation, troubleshooting common issues, and best practices for maintenance. We’ll cover everything from connecting your batteries safely to integrating the switch with your RV’s electrical system, ensuring you’re well-equipped to handle any power-related situation on the road.
We’ll explore the various types of switches, from simple single-battery setups to more complex dual-battery systems with isolation capabilities. Learn how to properly connect and disconnect your batteries, avoiding common mistakes that can lead to damage or injury. We’ll also delve into troubleshooting, providing solutions for common problems and offering maintenance tips to extend the life of your battery switch and associated components.
By the end, you’ll be a battery switch expert, ready to tackle any challenge your travel trailer throws your way.
Understanding Battery Switch Functionality in Travel Trailers
Your travel trailer’s battery switch is a crucial component, acting as the central control for your trailer’s power system. It allows you to easily disconnect your house batteries from the rest of the electrical system, preventing battery drain when your trailer isn’t in use and protecting against potential short circuits. Understanding its function and proper operation is essential for maintaining your trailer’s electrical system and preventing costly repairs.
Battery Switch Types
Several types of battery switches are commonly used in travel trailers, each offering different levels of control and functionality. The most prevalent are single, dual, and rotary switches. A single switch simply connects or disconnects your battery bank from the trailer’s 12-volt system. Dual switches offer separate control over two battery banks, often used in setups with a deep-cycle house battery and a starting battery for the trailer’s tongue jack or other accessories.
Rotary switches provide more options, often including positions for connecting both batteries to the trailer’s system, disconnecting both, or isolating one battery while the other remains connected. Choosing the right type depends on the complexity of your trailer’s electrical setup.
Operating a Typical Battery Switch
Proper operation of your battery switch is vital for preventing electrical issues. Most switches will have clearly marked positions, typically “On,” “Off,” and potentially additional positions depending on the type of switch. Before operating the switch, ensure you understand the positions and their corresponding functions as described in your trailer’s manual. To turn on the battery power, rotate or flip the switch to the “On” position.
This connects the battery to the trailer’s 12-volt system, powering appliances and lights. To disconnect the battery, simply move the switch to the “Off” position. This completely isolates the battery from the system, preventing any drain. Always refer to your specific switch’s instructions for detailed operation.
Battery Switch Power Flow Diagram
The following description details the power flow with a simple dual battery switch. Imagine a diagram with two battery icons (Battery 1 and Battery 2), a battery switch with three positions (“Off,” “Battery 1,” “Battery 2”), and a load icon representing the trailer’s 12-volt system (lights, pumps, etc.).
When the switch is in the “Off” position, both Battery 1 and Battery 2 are disconnected from the load. No power flows to the trailer’s 12-volt system.
When the switch is in the “Battery 1” position, only Battery 1 is connected to the load. Power flows from Battery 1 to the trailer’s 12-volt system. Battery 2 remains disconnected.
When the switch is in the “Battery 2” position, only Battery 2 is connected to the load. Power flows from Battery 2 to the trailer’s 12-volt system. Battery 1 remains disconnected.
This simplified diagram illustrates the basic principle. More complex systems with multiple batteries and switches will have more intricate power flow patterns. Always consult your trailer’s wiring diagram for a complete understanding of your specific setup.
Connecting and Disconnecting Batteries

Properly connecting and disconnecting your RV batteries is crucial for safety and the longevity of your battery system. This section will cover best practices and safety precautions to ensure you’re working safely and efficiently. Remember, RV batteries contain corrosive chemicals and store significant electrical energy, so caution is paramount.Connecting and disconnecting your batteries involves more than just clamping wires.
Understanding the correct procedure, and taking necessary precautions, will prevent accidents and ensure your system operates reliably.
Battery Connection and Disconnection Procedures
Before you begin any work on your battery system, always disconnect the negative (-) terminal first. This minimizes the risk of accidental short circuits. When reconnecting, attach the positive (+) terminal last. Use a wrench or pliers to tighten connections securely, preventing corrosion buildup and ensuring good electrical contact. Loose connections can lead to voltage drops and reduced performance.
Avoid forcing connections; if they don’t fit easily, check for obstructions or damage. After completing your work, visually inspect all connections for tightness and corrosion.
So, you’re planning a trip? Awesome! First things first: get travel insurance. Check out Aon travel insurance for some solid options; they’ve got you covered for a lot of unexpected situations. Then, if you’re hitting the road in a travel trailer, knowing how the battery switch on travel trailer function works is crucial.
It’s a simple thing, but understanding it will save you headaches (and potentially a dead battery!) down the line. Happy travels!
Safety Precautions When Working with RV Batteries
Working with RV batteries requires careful attention to safety. Always wear safety glasses to protect your eyes from splashes of battery acid. Battery acid is highly corrosive and can cause serious eye damage. Furthermore, ensure adequate ventilation. RV batteries release hydrogen gas, which is highly flammable and explosive.
Work in a well-ventilated area, away from any open flames or sparks. Never smoke near batteries. If you smell a strong odor of hydrogen gas, immediately move to a well-ventilated area and cease work until the odor dissipates. Rubber gloves are also recommended to protect your hands from corrosive battery acid.
Comparison of Battery Connection Methods
Different methods exist for connecting batteries to your RV’s battery switch. Each has its advantages and disadvantages.
| Connection Method | Pros | Cons | Suitability |
|---|---|---|---|
| Direct Clamp Connection | Simple, inexpensive | Prone to corrosion, potential for loose connections | Suitable for temporary connections or simple systems |
| Ring Terminals with Bolts | Secure, less prone to corrosion | Requires more tools and time for installation | Ideal for permanent installations, providing a strong and reliable connection |
| Crimped Terminals | Durable, professional appearance | Requires specialized crimping tools | Best for permanent connections where reliability and a clean installation are desired |
| Battery Connectors with Clamps | Easy connection and disconnection, reduces corrosion | Can be more expensive than other methods | Good for frequent connection/disconnection needs or where access is limited. |
Cleaning Battery Terminals and Connections
Regular cleaning of battery terminals and connections is essential for maintaining a healthy battery system. Corrosion buildup can increase resistance, reducing the efficiency of your system and potentially causing premature battery failure.To clean your battery terminals, first disconnect the negative (-) terminal. Then, use a wire brush or a battery terminal cleaner to remove any corrosion from both the terminals and the connection points.
A baking soda paste can also effectively neutralize acid buildup. After cleaning, apply a battery terminal protector to prevent future corrosion. Reconnect the terminals, ensuring they are securely fastened. Remember to reconnect the positive (+) terminal last.
Battery Switch and Electrical System Integration: Battery Switch On Travel Trailer Function
The battery switch is the central control point for your travel trailer’s 12-volt DC system, acting as a gatekeeper for power flow. Understanding its interaction with other electrical components is crucial for efficient power management and preventing damage to your system. This section details how the switch interacts with key components and explores the impact of battery type and switch use on system performance and battery lifespan.The battery switch directly influences the flow of power from your batteries to various components in your RV.
When the switch is in the “both” or “combined” position, power flows from both batteries (if you have two) to the converter, which transforms 12V DC to 120V AC to power your household appliances. It also supplies power to the 12V DC systems such as lights and water pumps. When the switch is in the “off” position, power is completely cut off from the batteries, preventing drainage.
So, you’re planning a trip? Awesome! Don’t forget to sort out your travel insurance – check out Aon travel insurance for options. They’ve got various plans to suit different needs. Speaking of trips, if you’re hitting the road in a travel trailer, knowing how the battery switch on travel trailer function works is super important.
It’s a simple thing, but it can save you a lot of hassle down the line – making sure your lights and appliances work as expected!
The “battery 1” or “battery 2” position directs power from a single battery, allowing you to charge or isolate one battery while using the other. The inverter, which converts 12V DC to 120V AC, usually draws power directly from the battery (or batteries) through the switch, though some higher-end systems may have separate circuits.
Battery Type and System Performance
Different battery types (flooded lead-acid, AGM, lithium) exhibit varying performance characteristics that interact with the battery switch. For example, lithium batteries have a much higher discharge rate compared to lead-acid batteries. This means that when the switch is engaged and the lithium batteries are supplying power to a high-demand device like an air conditioner, they’ll provide power more consistently without significant voltage drop.
Conversely, lead-acid batteries might experience a noticeable voltage sag under heavy load, leading to performance issues with sensitive electronics. The battery switch itself doesn’t change this inherent characteristic; it merely controls the power flow from whichever battery type is installed. A properly sized and appropriately chosen battery for your needs is crucial for optimum performance regardless of the switch’s position.
For example, using a small lead-acid battery to power a large air conditioner will result in poor performance regardless of whether the switch is on “both” or “battery 1”.
Battery Switch and Battery Lifespan
The battery switch plays a role in maximizing battery lifespan through proper power management. By allowing you to isolate batteries when not in use, you prevent parasitic drain from electronics that might draw small amounts of power even when the RV is parked. Regularly turning the switch to the “off” position significantly reduces this drain and extends the overall lifespan of your batteries.
However, the switch itself doesn’t magically extend the life of a poorly maintained or improperly sized battery. Regular battery maintenance (checking water levels in flooded lead-acid batteries, ensuring proper charging, etc.) is crucial for longevity, regardless of the battery switch’s functionality. A neglected battery will degrade quickly whether the switch is on or off.
Installing a New Battery Switch
Replacing a battery switch requires basic electrical knowledge and some DIY skills. Always disconnect the battery’s negative terminal before starting any work. A typical installation involves removing the old switch, noting its wiring configuration, and installing the new switch in the same location. Carefully match the wiring to the terminals of the new switch, ensuring proper connection to the batteries, converter, and other components.
Incorrect wiring can lead to system malfunctions or even damage. Consult a wiring diagram specific to your RV model and the new switch for accurate connections. A simple diagram might show three wires: one from each battery terminal, and one going to the main power distribution point in the RV. The new switch will have corresponding terminals for each wire.
Always double-check your connections before reconnecting the battery’s negative terminal. Failure to do so could result in short circuits and damage to your system.
Different Battery Switch Configurations
Choosing the right battery switch configuration for your travel trailer depends heavily on your power needs and budget. A simple single-battery setup might suffice for minimal use, while a more complex dual-battery system offers greater flexibility and capacity. Let’s explore the common options.
Single Battery System
This is the simplest setup. Your travel trailer is powered by a single 12-volt battery. A simple on/off switch manages the connection to the trailer’s electrical system. It’s inexpensive and easy to install but limits your power capacity and runtime. If you’re only using low-power appliances and have access to shore power frequently, this might be sufficient.
Dual Battery System with Combined Power
A dual-battery system uses two 12-volt batteries, typically connected in parallel using a battery combiner. This provides double the power capacity compared to a single battery system. The combiner allows both batteries to charge simultaneously from the alternator or shore power, and to supply power to the trailer’s electrical system collectively. This setup offers increased runtime but lacks the ability to isolate one battery from the other.
If one battery fails, the entire system is compromised.
Dual Battery System with Isolated Power (Using a Battery Switch), Battery switch on travel trailer function
This configuration uses two 12-volt batteries and a battery switch. The switch allows you to select between: (1) Both batteries supplying power to the trailer, (2) only one battery powering the trailer, or (3) isolating both batteries from the trailer’s electrical system. This setup offers the advantages of increased power capacity and the crucial ability to isolate a failing battery to prevent draining the other.
It provides greater control over power management, ensuring one battery remains fully charged for starting the tow vehicle.
Wiring Diagrams Examples
A simple diagram for a single battery system would show a single battery connected directly to a switch, and then to the trailer’s electrical system.A dual battery system with a combined power setup would show two batteries connected in parallel via a battery combiner, with the output of the combiner connected to the trailer’s electrical system.A dual battery system with an isolated power setup would illustrate two batteries, each with its own connection to the battery switch.
The switch then connects to the trailer’s electrical system, allowing selection of different battery configurations. The switch often includes a “Both,” “Battery 1,” “Battery 2,” and “Off” position.
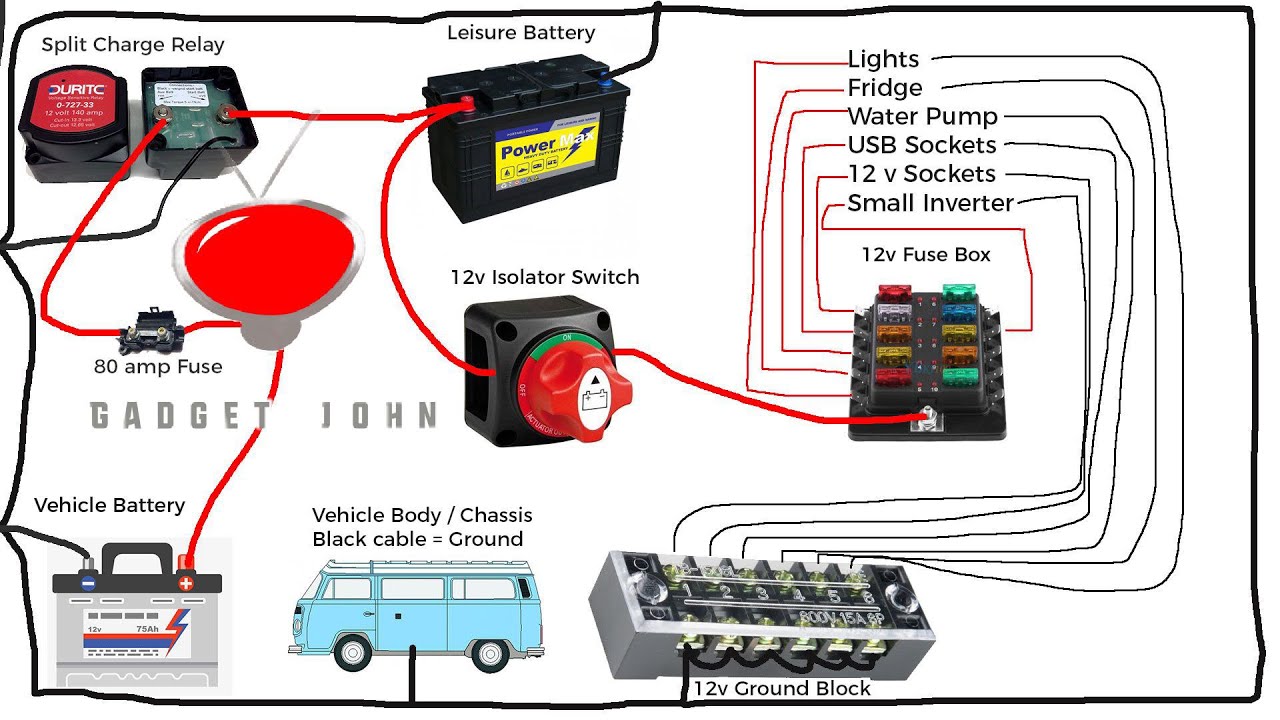
Dual Battery System with Battery Switch: Visual Representation
Imagine two 12-volt batteries side-by-side. Each battery has a positive (+) and negative (-) terminal. Each terminal is connected to a heavy-gauge wire. These wires lead to a battery switch with four positions (Both, Battery 1, Battery 2, Off). The output of the battery switch connects to the positive and negative buses of the trailer’s electrical system via similarly heavy-gauge wiring.
A fuse or circuit breaker is included in the positive wire to protect the system from overloads. This setup allows for the selection of either battery, both batteries, or none for power to the trailer’s appliances.
Mastering your travel trailer’s battery switch is key to a worry-free RV experience. From understanding the different switch types and their functions to safely connecting and disconnecting batteries, and effectively troubleshooting problems, this guide provides the knowledge you need. Remember, regular inspection and maintenance are essential for preventing issues and maximizing the lifespan of your battery switch and batteries.
So, get out there, explore the open road, and enjoy the peace of mind knowing you’re in control of your RV’s power system!
FAQ Corner
What happens if I leave my battery switch on all the time?
Leaving the switch on constantly can drain your house batteries, especially if you have parasitic draws from devices left plugged in. It’s best to turn it off when not using the trailer for extended periods.
How often should I clean my battery terminals?
Clean your battery terminals at least twice a year, or more often if you notice corrosion buildup. This helps ensure good electrical connections and prevents power loss.
Can I use different types of batteries with the same battery switch?
Generally yes, but it’s best to use batteries of the same type and voltage for optimal performance. Check your switch’s specifications and consult your RV’s manual for compatibility.
What are the signs my battery switch needs replacing?
Signs include difficulty switching, persistent corrosion around the terminals despite cleaning, or frequent power issues that can’t be resolved by other means. If you suspect a problem, consult a professional.
